Monday, December 10, 2012

Refinishing

We helped my parents move the weekend after Thanksgiving. During that process I inherited a few pieces of furniture and another high chair. Someone remind me to show a picture of the high chairs that we use (one was my Mom's when she was little). I got an old bookshelf (that used to be a credenza but the glass broke a while ago) that belonged to my Grandmother and a desk. The bookshelf was made in the 50's when veneer products first came out. It has these cool legs on it and is very well made. However, over the years it has sustained quite a bit of damage in the form of scratches and water spots. I really like the size, shape and look of the shelf, it just needed some new life put in to it. I researched how to refinish furniture (since I've never done this before) and then I got started.

Sorry. I forgot a true before picture. This was after it was sanded.
After paint! I used paint left over from one of our walls. It's called Coconut Shell.
In place in the living room. 


With my Mom's Christmas Village on it! 

The paint color I picked is the same as the accent wall in our living room and the shelf is placed on a regular wall that is light tan. However, for some reason the color on the shelf and the color on the accent wall are different shades of the same color. Very strange but looks good none-the-less. After Christmas I will put pictures and nic-nacks on the shelf. I love the way it turned out.

The other piece of furniture I got is a desk that my Grandfather made for my Dad when my Dad was a child. This piece is very special to me because I never got to meet my grandfather. After Christmas I am going to sand and re-stain the desk and place it in one of the kids rooms. I'm also going to repaint the high chairs and maybe recover the seats.

Soon I will show you the finished product of the quilt I am making for my Memaw. It's going to look amazing.

Wednesday, December 5, 2012

It's Beginning to Look A Lot (but not feel like) Christmas!

Can I be completely honest? I don't mind one bit that it is still warm and it's almost Christmas. I love the fact that I can wear my flip flops and t-shirts in December. I love that as I was working in the garage this week on a bookshelf I'm refinishing (more on that later) I was in shorts and a t-shirt and was comfortable. Do I wish it would get cold? Not really! I hate the cold! I hate bulky sweaters and jackets. They make me feel confined. I would never be a good northerner. I do enjoy cold days on occasion. When I don't have anywhere to go and can sit by the fire drinking cocoa, otherwise bring on the lows in the 60s and highs in the upper 70s.

This week I have been refinishing a bookshelf, decorating for Christmas and working on a quilt. Busy busy. We got our Christmas tree on Sunday. I LOVE real Christmas trees. They smell so wonderful and look so pretty. I have allergies but I'm willing to sacrifice myself for a few weeks to enjoy a real tree :) The house is now almost completely decorated and I love it. I love the twinkling lights, Nativity Set, Santa's and Snowmen, and stockings. This year I'm putting up a Christmas village that was my Mom's. I have to wait until the bookshelf I'm refinishing is done first so I have somewhere to put it. Hopefully I can get that done tomorrow and then I will be pretty much done. I have handled decorating without too much sadness. I had a few moments while hanging stockings and putting ornaments on the tree but I am enjoying the true meaning of Christmas this year and am celebrating that.

The outside of our house. No lights on the top this year. Saving money for the ones I really want for next year. This is the first year you can see the columns because we are re-landscaping. Those 2 trees are kids tress in the kid rooms.

Front Door Wreath I made this year :)

Grant's ornament on the tree. Love how he is represented there.
Grant's other ornament
Our Family Ornament from last year. I miss those 2 kiddos.
Stockings on the mantel with Grant's urn in the middle. The 2 stockings on the ends are for our dogs.
My Willow Tree Nativity Set. I love this set and plan on getting a few more of the pieces in the future. 

So, there you have it. Christmas decorations a-la-Bybee. I'll show the bookshelf and Christmas village when I get it up. The bookshelf is done but looks empty (cause it is) so I don't want to share just yet. My Christmas Card will be posted soon too :)

Merry Christmas!

Thursday, November 29, 2012

A Happy Thanksgiving With Some Sadness Mixed In

We did have a good Thanksgiving. We spent time with both of our families. I loved being with my nieces and nephews. Seeing their smiles and hearing them playing. I even got to go fishing with my brother, Dad, niece McKenzie and a friend of my brother's. It was a nice afternoon spent on the lake enjoying being together. I enjoyed helping my mom make Thanksgiving and snacking as we went. It was a nice few days spent with family enjoying each other. I love my large family and the crazy that goes with it. We helped my parents move a little closer to my siblings. Moving is always an adventure with my family and this time was no different. We had a very busy few days going here and there, seeing friends and family and I enjoyed it. We have some of the greatest friends and family. 

Thanksgiving was a little bittersweet. I've been told by my friends who have gone before me on this path that the first milestones are the hardest. I fully expected it to be true and it has been. As with the other milestones we have passed Thanksgiving wasn't much different. It seems the time leading up to a milestone is harder than the actual milestone. I've been doing my best this month to be thankful. It always helps me with my grief to be thankful. I've even continued to be thankful for my baby boy. He is one of our biggest blessings and greatest miracles and I'm glad he is mine. However, being thankful for him doesn't take away the sting that he isn't with us. I couldn't help but think how cute he would have looked in a thanksgiving outfit and how our family would have been passing him around oohing and ahhing over him. Some tears fell on a few different occasions and I just let them fall. I needed to feel it. I've learned that my journey is easier if I allow myself to feel the sadness when it comes instead of suppressing it. One of the times that it hit me the hardest was when I was Black Friday shopping with my mom and sister. A time I least expected it. Walking through the store and seeing tiny Christmas outfits and toys for infants. I had to walk away with tears in my eyes.

I'm sure that as Christmas approaches it will be similar. Days and moments that are wonderful and those that are sad. I will continue to thank God for my family, my son, my amazing husband, and for His love. 


Wednesday, November 21, 2012

1 year- Since One of the Happiest Days of My Life

It has been 1 year to the day that I found out I was pregnant with Grant. I suspected before that day but on the morning of November 21, 2011 I had a positive pregnancy test. I went to the doctor and they confirmed that yep, I was indeed pregnant. Jonathan and I were so so so excited. So excited we had a really hard time keeping it to ourselves. It had been 3 long years of waiting for that positive test. I am so thankful for that day. It was literally one of the happiest days of my life.

I never imagined that as I approached the 1 year date of finding out we were expecting I would be grieving the child that I only had for a little while. I am so very glad that I got to carry him for that short time though. I'm glad that I got to hold him, bathe him, dress him, sing to him and take pictures of his sweet face. If I could go back to 1 year ago I wouldn't change a single thing. He is one of my greatest blessings.

Tuesday, November 20, 2012

food.....yumyums.....delicioso....

MMMMM food. I have had an adventurous spirit lately when it comes to cooking. I have been making things that I haven't made before. Mostly in my Crock-pot. I love my Crock-pot. Definitely need to find more recipes for that bad boy.

First I made beef stew in the crock-pot. I made it on a cold fall night and it was delicious. I based my recipe off of this one Beef Stew.  I made a few changes because I didn't have everything listed and I didn't want to go back to the store (my phone with the list online wouldn't work while at the store so I had to wing it). Here are the changes I made. I put the beef stew meat in the crock pot frozen. I just poured the flour mixture in (no stirring to coat) and I didn't use a bay leaf or celery. I also used baby carrots (about 1/2 a small bag) instead of slicing whole carrots. I added a little more beef broth than the recipe calls for (maybe 2 cups total). We had some fresh yeast rolls to go with it and yum, it was good. Sorry, I forgot to take a picture, I was busy eating the deliciousness :)

Last night I made Homemade Beef Stroganoff. I got the recipe from my friend Hillary here Easy Homemade Beef Stroganoff. It was also super delicious. I didn't alter her recipe at all and once again threw the beef stew meat in the crock pot frozen. Since it was just the 2 of us there are plenty of leftovers that are now in the freezer waiting for us to return from our holiday travels. Here is a picture of the finished product on top of some egg noodles. Sorry about the quality of the photo. I took it with my phone and didn't pay attention if it was focused, oops.

Last night I also made my chocolate chip cookies. I basically follow the Nestle recipe. However, I do things a little differently. Here is my version of their recipe.

Ingredients:
2 sticks butter                                    3/4 cup brown sugar (packed)
3/4 cup white sugar                           2 1/4 cup flour
1 tsp baking soda                              1 tsp salt
1 tsp vanilla                                      2 eggs
2 cups semi sweet chocolate chips

Instructions: Preheat oven to 375 degrees. In a large glass bowl place the 2 sticks of butter in the microwave and microwave on high for about 1 min 30 seconds. You want the butter to be almost completely melted. Then add brown sugar, sugar, salt, baking soda and vanilla and stir with a wooden spoon to combine. Then add 2 eggs and stir to combine. Next add the flour and stir until it is all incorporated. Then add the chocolate chips and stir. I then use a tea spoon (like you would eat with) to scoop the dough out and place on a cookie sheet. Bake in the oven for 7-9 minutes until top is just beginning to be golden. Remove from oven and let cool on sheet for 1-2 minutes. Transfer to counter on paper towels to cool completely.
Now I am ready for all of the Thanksgiving fare over the next few days!

Monday, November 12, 2012

Holidays Are Approaching

This time of year is my favorite. I absolutely LOVE Christmas! I love what it stands for. My savior's birth. I love seeing kids get excited and the joy on their faces. I love Christmas music, lights, trees, and even Santa. I would decorate for Christmas as early as October if my hubby would allow it. However, he thinks we should celebrate Thanksgiving before starting to celebrate the Christmas season. Something about not forgetting what we are thankful for. I say "why can't we be thankful for Christmas?" :) Thinking about the holidays this year has brought some serious twinges of pain for me. I am still excited to buy lights to hang on the house and to pick out a Christmas tree to decorate. I can't wait to get out our nativity scene. However, I'm also a little sad. There will be no stocking for Grant. I won't get to pick out a "my first Christmas" outfit. We do have two ornaments for Grant. One was sent to us by a friend with his birth stats on it and the other is a sweet angel that my sister bought for us with Grant's name on it. They will both hang proudly on the tree. My little sister took our Christmas card pictures last week, another bittersweet moment. We were able to incorporate Grant into some of the photos but oh how I missed picking out his outfit and dealing with a squirming baby. I really miss that sweet boy. 

Here are some photo previews. I'll post our Christmas card after it is in the mail.


Tuesday, November 6, 2012

Micro-Preemie/Preemie Gown and Sleeper Tutorial

This tutorial is mainly for bereavement purposes. I don't think these would work well in the NICU because they wouldn't allow for all of the wires, IV's, etc. I'm sure they could be modified for that purpose but my purpose was so that these sweet babies who die too soon would have something to wear. No parent should have to be sad because their baby is too small for clothes and therefore will go naked.

We will start with the Gown tutorial first. Some of the steps for the gown and sleeper are the same. If you want the pattern please see this website Teeny Tears. They will be uploaded there in the near future. A soft knit fabric works best for the gown, hat and sleeper.
Gown Instructions
1. Cut out 1 front piece, 2 back pieces and 2 sleeves from your fabric.

2. With right sides together sew center back seam up to wear the facing begins.

3. With right sides together sew sleeves to front and back pieces at the four shoulder seams.

4. Hem or add ribbing to the neck line. (I recommend adding ribbing because they are so tiny, making hemming difficult. You can make your own out of the same fabric by cutting a 1 1/2 inch wide strip of fabric. Fold each side in 1/4 inch and then fold in half. Place neck edge into the fold of the strip and topstitch down.) Fold the facings in while hemming or ribbing.


5. Hem sleeves.

6. With right sides together sew underarm/side seams. Clip at pivot. On one side leave a small 1/2 inch opening in the side seam about 1 1/2 inches from the bottom of the gown. (This is where the ribbon will go later)
Example of opening left for the ribbon.

Sew side seams where pins are.
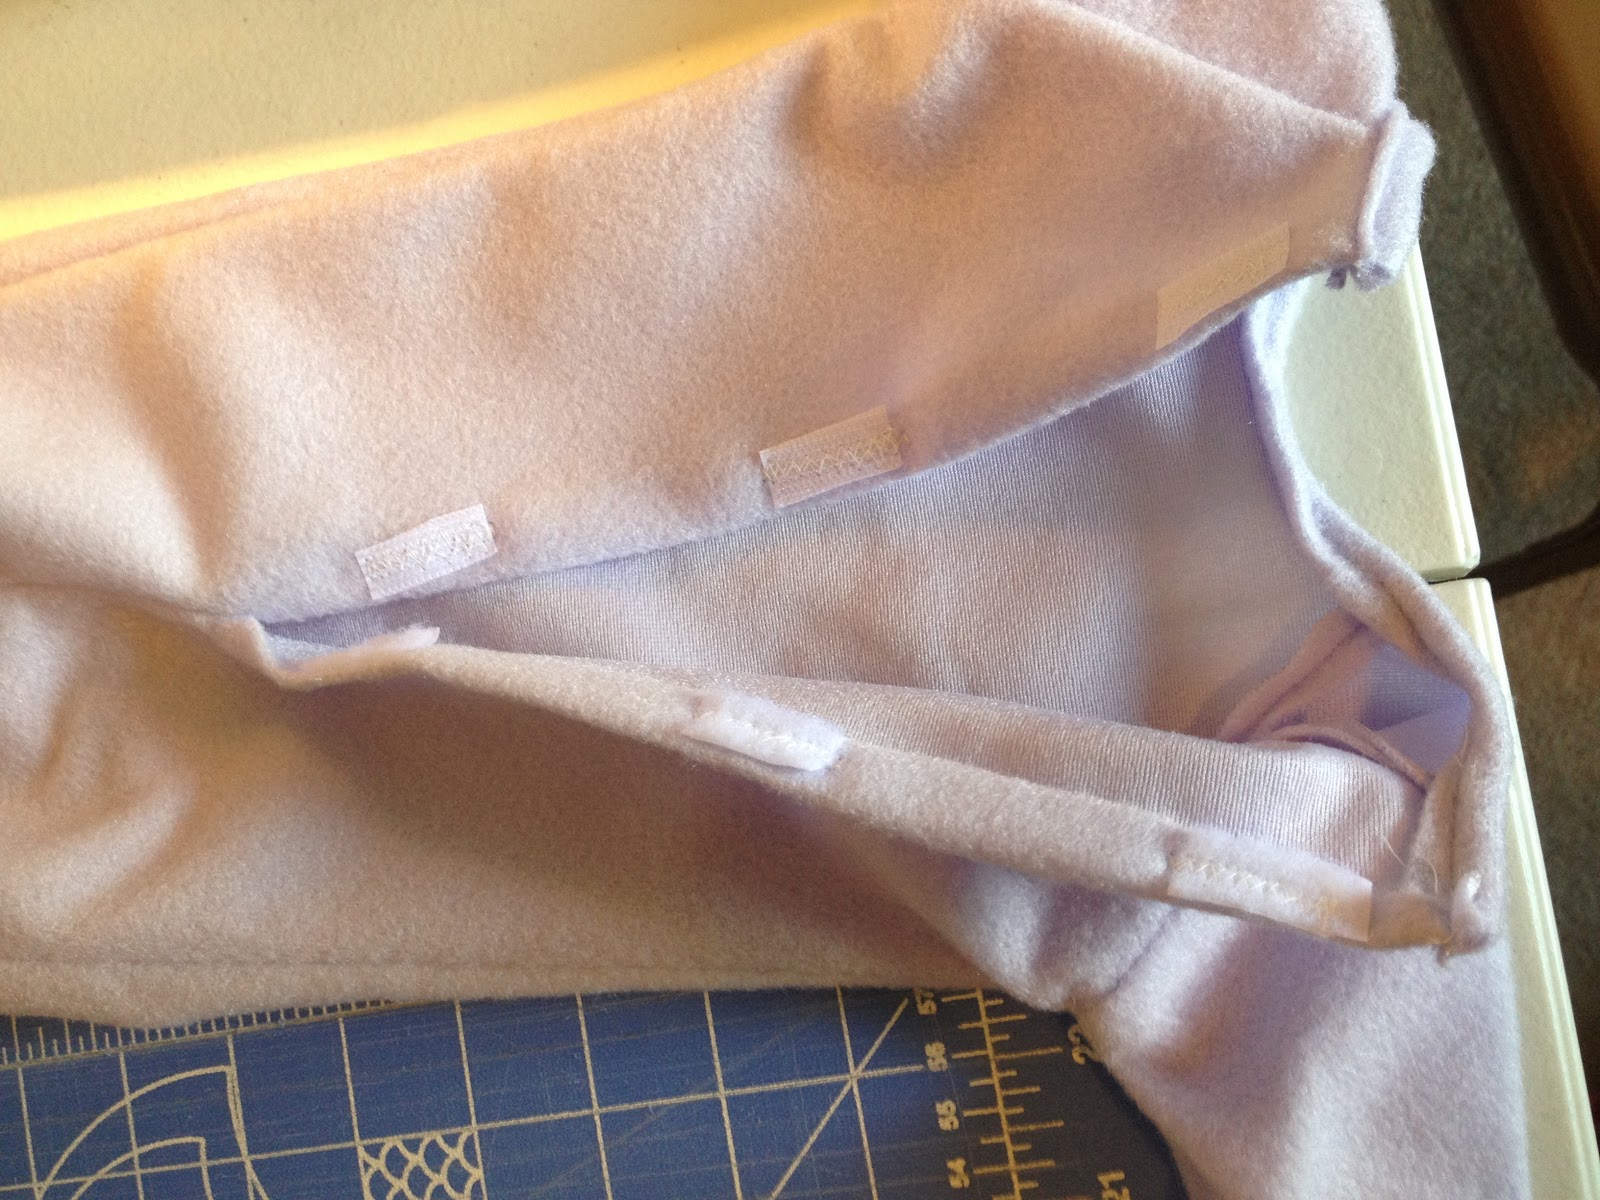
7. Fold facings under and apply velcro closures. You could use snaps or buttons also but velcro seems to work well.
Note: When applying velcro make sure the "rough" side of the velcro is facing out away from the body. These babies have skin that is very fragile and we don't want anything "scratchy" touching them.

I use a wide zig zag stitch to attach the velcro.
8. Sew a 1 inch bottom hem. Thread the ribbon through using a safety pin and tie to gather the bottom of the gown.

Sorry the pictures are sideways. I couldn't get them to rotate.
Sleeper Instructions
1. Cut out 2 back pieces, 2 front pieces and 2 sleeves.

2. Sew center back and center front crotch with right sides together. Leave opening open (where facings start).
For center back sew from neck line and stop where the upslope stops.
For center front all you sew is where the curve is in the crotch area.
3. Sew sleeves to the front and back pieces at 4 shoulder seams with right sides together. 

4. Hem or add ribbing to the neck. (see the note above about ribbing) Fold the front facings in as you are hemming or adding ribbing.

5. Hem sleeves. 

6. With right sides together sew underarm, side seam, inseam, side seam and underarm. Clip at curves. Turn right side out. While sewing these seams fold up the back of the foot at the fold to line to create the heel. Pin in place and sew side seams to secure. 


7. Apply velcro closure to the facings. You could use buttons or snaps also but the velcro seems to work well. See Note above for tip on applying velcro.

Added Disclaimer: The patterns that will be posted on the Teeny Tears websites I designed by looking at and then altering common sleeper/gown patterns. The facing on most of the patterns I could find is perfect for a full size baby but when you make them smaller and smaller it became almost non-existent, therefore I made it larger on my patterns. I tried to make the opening large enough that dressing these tiny little ones would be feasible but that the clothes would still look like traditional baby clothes. The gown is probably easier to put on a tiny baby and could even be altered to where the facing extends to the bottom of the gown on the back with velcro closures all the way down (instead of a seam part way down with opening only half way) so that there is no pulling it over their legs or head. I purposefully placed the gown closure in the back to allow it to look more like traditional baby clothing.